FLOATING LANTERN
Updated with pictures and video clip
Scoll down
Picture used with permission of Hallowed Haunting Grounds.
Interpreted by Brian Taylor
(KkrazyKkaren's Better Half)
This is my version of the famous MacLaurin Floating Lantern (MFL) of The Hallowed Haunting Grounds
as seen at www.hauntinggrounds.org
To download a complete 5 page instruction in Word format click here.
For actual pictures of our MFL On Picture Below

To see a video of our MFL On Picture Below
To view video you will need Real Player

Visit our haunt's website (Great Lake FrightFest) at http://greatlakesfrightfest.com/
Materials Needed
Tools Needed
Lantern Assembly
1. Removing the glass chimney from the lantern (set aside so not to break)
2. Cut out the bottom of the lantern with a can opener
3. Solder the hook-up wires to the LED, one to each lead of the LED and heat shrink/tape
4. Wrap a small piece of the plastic grocery bag (this is your flame) around the LED and tape to the leads
5. Pull the cotton wick out of the lantern
6. Feed the wires and LED down from where the wick came out (the top of the LED should be just above the housing)
7. Solder the 15 ohm resistor to one of the hook-up wires and heat shrink or tape solder joint
8. Cut the lights off the 10 light string of X-mas lights leaving about 6 inches of wire attached to the battery case
9. Temporarily hook up (twist together) the wires from batter holder, one to the wire from the LED and the other to the other end of the resistor.
10. Put in batteries and see if the LED lights, if not try switching the two wires and try again (the polarity of the LED has to be correct for them to work)
11. Solder and tape the twisted connections listed in # 9
12. Hot glue the battery holder in to the bottom of the lantern
13. Turn the lantern on and adjust the height of the "wick"/ LED (if your careful use can actually use the wick adjustment. Turn off and set aside.
Mobile Assembly
This is the most time consuming, but with a little patience you with have a great looking / working prop.
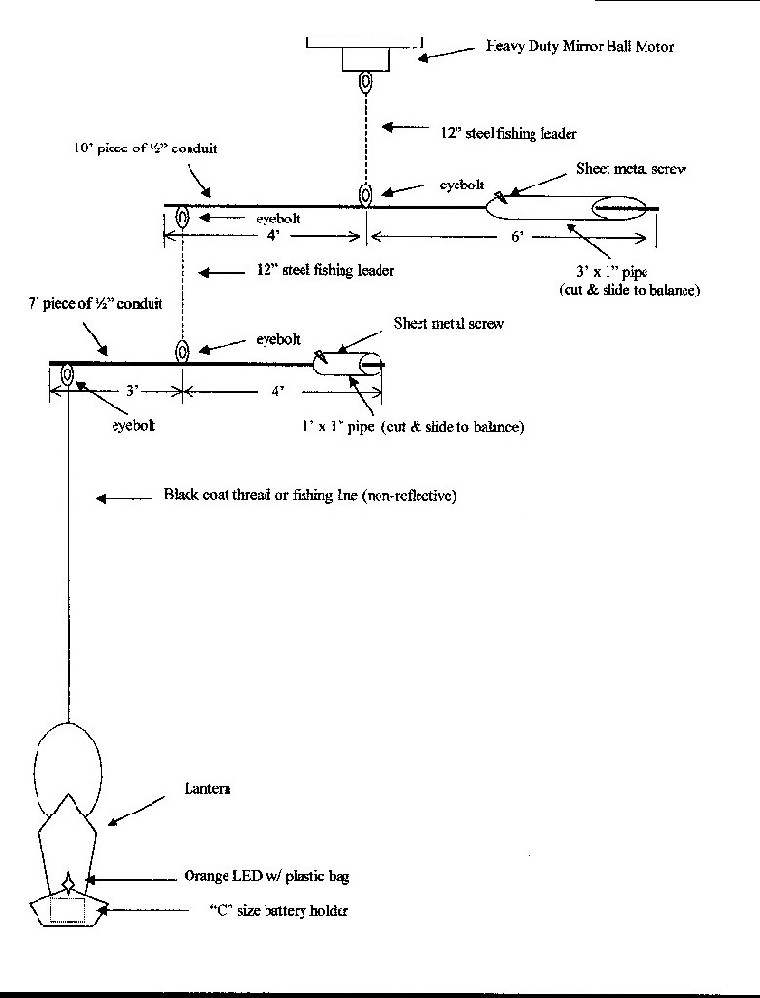
PART ONE: The Lantern Beam
1. Determine how much area you really have for this prop, you will need a clear area of about 20 foot diameter for these dimensions to work.
2. Cut a 3-foot piece off one of the pieces of ½ conduit and use it for whatever you want. You will need the 7- foot piece.
3. About 1 inch in from one end of the 7-foot piece of conduit,drill a hole through the conduit and put in one of the eyebolts and tighten the nut. You will want to bend over the excess threads to make sure the nut doesn't come off. This prop is heavy when done (10 - 15 pounds) you don't wanting it falling on someone's head.
4. Measure in 3 feet from the end with the eyebolt (above) and drill another hole through the conduit and put in another eyebolt from the oppostie direction of the eyebolt in # 3, tighten the nut and bend over the excess threads.
PART TWO: The Motor Beam
1. About 1 inch in from one end of the 10-foot piece of conduit, drill a hole through the conduit and put in one of the eyebolts and tighten the nut and bend over the excess threads.
2. Measure in 4 feet from the end with the eyebolt (above) and drill another hole through the conduit and put in another eyebolt from the opposite direction of the eyebolt in # 1, tighten the nut and bend over the excess threads.
Now for the difficult part.
PART THREE: BALANCING THE "LANTERN BEAM"
1. Weigh the lantern with the batteries (pounds and ounces). Write it down!
2. Weigh the 7-foot piece of conduit (pounds and ounces). Write it down!
3. Weigh the 1-foot piece of 1-inch pipe (pounds and ounces). Write it down!
Now for some 5th grade math.
Take the weight of the lantern multiply it 3 and then divide the total by 4. This should give you the approximate weight of your counterweight (the 1-foot 1-inch pipe)
Lantern Weight times 3 = "A"
"A" divided by 4 = "B"
"B" equals the approximate weight of your counter balance (1-foot
of 1-inch pipe).
If "B" is less than the weight of the 1-foot piece of pipe then cut off little lengths at a time of the pipe until it equals "B".
4. Hang the 7-foot conduit from the center eyebolt, from a secure place with the piece of nylon rope at a workable height.
5. Hang the lantern on the other eyebolt by a piece of the black tread.
6. Take the 1-foot section of the 1-inch pipe and slide it over the opposite end of the 7-foot conduit.
7. Side the piece of 1-foot by 1-inch pipe in and out until the "lantern beam" balances.
8. Drill a small hole in the top of the 1" pipe and screw in a sheet metal screw just tight enough to keep the pipe from moving. You will tighten the screw fully after the final balancing.
9. Carefully set your completed "lantern beam" aside for final assembly later.
PART FOUR: BALANCING THE "MOTOR BEAM"
1. Add the weights of the lantern, the 7-foot piece of conduit and the counter weight (1-foot by 1-inch pipe). This equals the entire weight of the "Lantern Beam" Write it down!
Now for some more 5th grade math.
Take the weight of the lantern beam assembly multiply it 4 and then divide that total by 6. This should give you the approximate weight of your other counterweight (the 3-foot by 1-inch pipe)
Lantern beam assembly weight times 4 = "C"
"C" divided by 6 = "D"
"D" equals the approximate weight of your counter balance (3-foot
by 1-inch pipe).
If "D" is less than the weight of the 3-foot piece of pipe then cut off little lengths of the pipe until it equals "D".
2. Hang the 10-foot conduit from the center eyehook, from a secure place with the piece of nylon rope at a workable height.
3. Hang the "lantern beam" assembly from the other eyebolt.
4. Take the 3-foot section of the 1-inch pipe and slide it over the opposite end of the 10-foot conduit
5. Side the piece of 3-foot by 1-inch pipe in and out until the whole assembly balances.
6. Drill a small hole in the top of the pipe the 1" pipe and screw in a sheet metal screw just tight enough to keep the pipe from moving. You will tighten the screw fully after the final balancing.
PART FIVE: FINAL ASSEMBLY
1. Hang the mirror ball motor from a very secure support.
2. Attach a steel leader (by the opposite end from the "hook") to the mirror ball motor.
3. Attach the 10-foot conduit "motor beam" by the center eyebolt to the leader hook
4. Attach the other leader (by the opposite end from the "hook") to the other eyebolt on the 10-foot conduit.
5. Attach the hook of that leader to the center of the 7-foot "lantern beam"
6. Hang the lantern by whatever length of black thread needed to place the lantern at a height that it looks like someone is carrying it.
7. Once fully assembled allow the completed assembly to "settle" the entire should "balance out" and be perfectly level when at rest. If not, carefully loosen the screws and slide the 1" pipe in or out to make it balance starting with the "lantern beam" then move on to the "motor beam". If you still can't get the beams to balance you can carefully add or subtract weight by drilling holes in the 1" pipe or adding additional screws to it. Tighten the"set screws" in both of the 1" pipe counter weights.
8. Turn the lantern on
9. Plug in the motor (it may take a few moments before you see the lantern moving)
10. Sit back and watch how the lantern appears to "float" and move in no particular pattern.
The effects of the wind on this version of the MFL adds even more radomness to the illusion.
If the "assembly" might be visible you will want to paint it flat
black. Be sure to sand down the conduit well before painting.
If you have any specific questions feel free to e-mail me at:
Subject: Floating lantern
Hope you have as much fun building this as I did.
Brian
(KkrazyKkaren's Better Half)